
Xeromaus
The Rogue Mod
I should have put this up a while back, but I assumed that people could learn most of this within a few days/runs/tries. I was horrendously wrong. Pugging this run this morning has lead me to see how badly this walkthrough is required. I'm deeply sorry I didn't post this sooner. You can complete challenge or hard mode using the described method, though be warned...enemies on challenge will curb stomp you if given even a second to do so. Do MANY runs of hard mode before attempting challenge. I don't glitch, I don't exploit, I don't hack, don't expect any in this walkthrough. We're doing it right or not at all.
Lets gets some basics out of the way first:
The entrance tunnel is just a warm up, you can literally just run by the enemies present and continue on to the meat of the run if you desire, or take 30 seconds and waste them. Your call, but better to start playing safe now and not develop bad habits.
Once you reach the ropes going up, ascend and stop there. Let your team all arrive, and move as a unit from here on out. Restock if necessary.
Once the window blows, JUMP DOWN. Don't wait and kill enemies, don't fix your build, don't select a new grenade type. You had literal hours/days in game to get that stuff set up...get in the main room NOW.
Once you're down, move to the right and up the stairs, using the generator area cover to kill most of the initial wave, especially the shotgunners (who will gleefully run up the same stairs you did and bottleneck). Refer to pic below (for this specifically, but also for any other location references), sorry for it's size, but I'm sure you can get it:
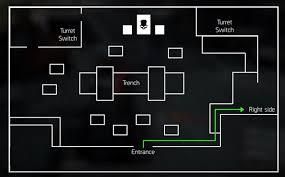
Once the shotgunners are dealt with, remove any obstacles to reaching the trench (that bar in the center of the pic), then move as a group quickly into the trench (I can't believe I have to specify this, but NOT on top of the trench, INSIDE it). Restock if necessary.
You are now inside your home, and it's time to become agoraphobic (fear the outside world). Unless you are grabbing the bomb dropped by an enemy or placing it (more on those soon), you.do.not.leave.your.home...ever. We will count the stairs descending down on both sides as part of your home, but those are scary places that can hurt and defile you, respect them as such. If you must go onto the stairs, do so quickly, do what you need to do, then get back down just as quickly. The two ends of the trench are covered in mortar/bullet/grenade/everything proof grates (I know, I know, but it works in this universe, don't argue), while the middle is open. Use the grates to your advantage, and use the middle sparingly, as the mortar can find it.
Every non-APC enemy can be killed from your home. It may take creative shooting angles, use of skills or grenades, or whatever, but it can be done.
Now we sit in our home, usually two agents on each end of the trench, and kill whatever we can see. Be mindful of red circles, and exit them as quickly as possible. This means drop whatever you're doing and get out of it. One shot left to kill an enemy? Stop shooting and get out of the circle first. Reviving a teammate? Leave him and save you. Patience wins this run, not stubbornness.
You've seen drones in the entrance tunnel, but you'll see more now, as their own wave and as a component of other waves. Kill them quickly, as they tend to stun you, leading to problems.
Remember those microphones I may have mentioned to bring before? When you see even one shotgunner, YELL IT INTO THE MICROPHONE. When you hear somebody yell about shotgunners, get under a grate, drop any healing stations you have, pop a pulse, pop security link, pop anything survival-ish or increase-in-damage-ish...this is apocalyptic nuclear shit hitting the turbo-charged helicarrier-sized fan, behave and react accordingly. These guys are the biggest threat to finishing the run. Stuns, guns, melee, explosions, turrets, angry wet cats, whatever, just make them dead, and keep you and your squad alive. There is a pattern to their appearance, but I'd rather you communicate their arrival than bet on a pattern. A few times running the place will let you learn that on your own.
On the 5th, 10th, and 15th round (I think, the 10th may be 1 off in either direction, but I'm fairly certain), an enemy will appear highlighted by a yellow diamond over his head. He is carrying a bomb. You want the bomb. You do not want the bomb bad enough to run out of your home to get it (unless you absolutely HAVE to. One of the carriers will likely appear on an upper catwalk and refuse to come down. If you MUST go to him, DO NOT go alone, take a friend along for support and cover). Let him come close to your home, then kill him and get your most resilient (highest health, highest armor, etc) squad mate to take his bomb. Whittle the remainder of the wave down to 4 enemies, with none left on the left side between you and the APC boss/the upper left hand room. Once only 4 are left, and a path is cleared, the bomb carrier and another player run to the upper left hand room, while the remaining two players stay safe under the grates. Once the runners are there, the not-bomb carrier locates the turret control panel on the wall closest to the APC (you've seen turret control panels, they're rectangular with one large light and buttons) and shuts it off, while the bomb carrier immediately runs to the rear of the APC, places the bomb, and gets back to the small room, all as fast as possible. Not-bomb-carrier-guy should have his face pressed into the turret control, and shut it down again the moment it reactivates. Once the bomb is placed, and the turret is shut off again, run back home and under a grate, because it's time for a missile barrage. (note: security link is a wonderful thing to have here, as you're only shutting down one turret. Their hits hurt pretty bad, and they give you a small but repeatable stun too boot. As with all other parts of this run, be as cautious and safe as possible at all times...long runs can still lead to a win, but dying hurts your odds greatly.)
The waves will intensify in both number of enemies and enemy strength as time goes on, eventually including snipers, grenadiers, drones, shotgunners, LMG heavies, and all other manner of enemy type (also including elites). The plan does not change. Kill/damage what you see, retreat to safety, repeat. Stay.in.your.home.
On the completion of the third bomb run, the run should end in a cacaphony of explosions and death sounds. Stay safe at home until the "cleared" message/sound comes up. All enemies "should" be wiped out in the final blast, but this game likes to surprise people with unintended mechanics. Stay safe until you KNOW it's safe.
Grats, you won! Do your squad mates a favor and trade or drop anything you won't use...you're only giving up a tiny bit of crafting materials, don't be stingy.
Some notes:
Lets gets some basics out of the way first:
- Bring. A. Microphone. Doesn't matter if it's crappy. This is endgame content, you need to communicate. One came with your system if you're on console, and likely one is built into your comp if you're on pc. If not, you spent $60 (or 30ish if preowned) on a game, you can spend another 10-20 on amazon for one that works, or 30-40 for one that works well. There's literally no reason for you to be silent in the run, and myself and others are beginning to lose patience with it...you'll likely be removed from group if you can't be bothered to communicate.
- Now that you have a microphone, adjust it's settings and location. No one wants to hear you breathe. No one wants to hear your music blaring away over all other speech. Microphone volume too low or too loud is just as bad. Depending on your choice of mics, you may need to enable push to talk if your mic doesn't filter out non-voice sounds. You'll only have to do this once, take the time...it doesn't help you or your squad to bring a mic that needs to be muted.
- The minimum gear score to enter is 140, though the game will allow some to slip through at lower levels. Don't listen to the game. Players at the recommended 160 gear score most often need to be carried through, and the carriers hate you for that. Still wearing ANY purples? Stay out. There's vanilla challenge mode runs that are right up your alley to gear up. Most players are kicking others for having less than 170 gear score, with some only running with 180+. If you can't be bothered to gear up for endgame, we can't be bothered to carry you.
- Health lower than 60k? Please go die elsewhere. Armor under 40-45% mitigation? See "health under 60k". Other stats of any level can be worked with, though obviously the higher the better. We need you on your feet and fighting, and these guys hit HARD.
- During the fight, the APC boss will intermittently launch a mortar or missiles at you. Both of these have a distinctive sound, and a large red circle on their impact area. Even if you're somehow built to survive such a hit, pretend you can't and run away, as quickly as possible. They will kill you, and not to downed, but to dead. Being dead (or even downed) ANYWHERE but under a grate (info coming) will likely get your reviver killed, and bring your run to an end.
- At least one (1) (uno) (eins) (un) (odin) (ekab) (wahed) player must be under a grate (info coming) at all times. If everyone dies, your run starts over from wave 1, but if only three or less die, you have a chance to save the run.
The entrance tunnel is just a warm up, you can literally just run by the enemies present and continue on to the meat of the run if you desire, or take 30 seconds and waste them. Your call, but better to start playing safe now and not develop bad habits.
Once you reach the ropes going up, ascend and stop there. Let your team all arrive, and move as a unit from here on out. Restock if necessary.
Once the window blows, JUMP DOWN. Don't wait and kill enemies, don't fix your build, don't select a new grenade type. You had literal hours/days in game to get that stuff set up...get in the main room NOW.
Once you're down, move to the right and up the stairs, using the generator area cover to kill most of the initial wave, especially the shotgunners (who will gleefully run up the same stairs you did and bottleneck). Refer to pic below (for this specifically, but also for any other location references), sorry for it's size, but I'm sure you can get it:
Once the shotgunners are dealt with, remove any obstacles to reaching the trench (that bar in the center of the pic), then move as a group quickly into the trench (I can't believe I have to specify this, but NOT on top of the trench, INSIDE it). Restock if necessary.
You are now inside your home, and it's time to become agoraphobic (fear the outside world). Unless you are grabbing the bomb dropped by an enemy or placing it (more on those soon), you.do.not.leave.your.home...ever. We will count the stairs descending down on both sides as part of your home, but those are scary places that can hurt and defile you, respect them as such. If you must go onto the stairs, do so quickly, do what you need to do, then get back down just as quickly. The two ends of the trench are covered in mortar/bullet/grenade/everything proof grates (I know, I know, but it works in this universe, don't argue), while the middle is open. Use the grates to your advantage, and use the middle sparingly, as the mortar can find it.
Every non-APC enemy can be killed from your home. It may take creative shooting angles, use of skills or grenades, or whatever, but it can be done.
Now we sit in our home, usually two agents on each end of the trench, and kill whatever we can see. Be mindful of red circles, and exit them as quickly as possible. This means drop whatever you're doing and get out of it. One shot left to kill an enemy? Stop shooting and get out of the circle first. Reviving a teammate? Leave him and save you. Patience wins this run, not stubbornness.
You've seen drones in the entrance tunnel, but you'll see more now, as their own wave and as a component of other waves. Kill them quickly, as they tend to stun you, leading to problems.
Remember those microphones I may have mentioned to bring before? When you see even one shotgunner, YELL IT INTO THE MICROPHONE. When you hear somebody yell about shotgunners, get under a grate, drop any healing stations you have, pop a pulse, pop security link, pop anything survival-ish or increase-in-damage-ish...this is apocalyptic nuclear shit hitting the turbo-charged helicarrier-sized fan, behave and react accordingly. These guys are the biggest threat to finishing the run. Stuns, guns, melee, explosions, turrets, angry wet cats, whatever, just make them dead, and keep you and your squad alive. There is a pattern to their appearance, but I'd rather you communicate their arrival than bet on a pattern. A few times running the place will let you learn that on your own.
On the 5th, 10th, and 15th round (I think, the 10th may be 1 off in either direction, but I'm fairly certain), an enemy will appear highlighted by a yellow diamond over his head. He is carrying a bomb. You want the bomb. You do not want the bomb bad enough to run out of your home to get it (unless you absolutely HAVE to. One of the carriers will likely appear on an upper catwalk and refuse to come down. If you MUST go to him, DO NOT go alone, take a friend along for support and cover). Let him come close to your home, then kill him and get your most resilient (highest health, highest armor, etc) squad mate to take his bomb. Whittle the remainder of the wave down to 4 enemies, with none left on the left side between you and the APC boss/the upper left hand room. Once only 4 are left, and a path is cleared, the bomb carrier and another player run to the upper left hand room, while the remaining two players stay safe under the grates. Once the runners are there, the not-bomb carrier locates the turret control panel on the wall closest to the APC (you've seen turret control panels, they're rectangular with one large light and buttons) and shuts it off, while the bomb carrier immediately runs to the rear of the APC, places the bomb, and gets back to the small room, all as fast as possible. Not-bomb-carrier-guy should have his face pressed into the turret control, and shut it down again the moment it reactivates. Once the bomb is placed, and the turret is shut off again, run back home and under a grate, because it's time for a missile barrage. (note: security link is a wonderful thing to have here, as you're only shutting down one turret. Their hits hurt pretty bad, and they give you a small but repeatable stun too boot. As with all other parts of this run, be as cautious and safe as possible at all times...long runs can still lead to a win, but dying hurts your odds greatly.)
The waves will intensify in both number of enemies and enemy strength as time goes on, eventually including snipers, grenadiers, drones, shotgunners, LMG heavies, and all other manner of enemy type (also including elites). The plan does not change. Kill/damage what you see, retreat to safety, repeat. Stay.in.your.home.
On the completion of the third bomb run, the run should end in a cacaphony of explosions and death sounds. Stay safe at home until the "cleared" message/sound comes up. All enemies "should" be wiped out in the final blast, but this game likes to surprise people with unintended mechanics. Stay safe until you KNOW it's safe.
Grats, you won! Do your squad mates a favor and trade or drop anything you won't use...you're only giving up a tiny bit of crafting materials, don't be stingy.
Some notes:
- Enemies can run down the stairs into your home, or drop into the open middle. ALWAYS be aware of whats in your home, and don't get stuck fixated on distant enemies. I've seen runs slaughtered by one smg-wielding purple douchebag because no one saw him drop in. This goes double for shotgunners. Being in the trench means you only need to look left, right, and up for enemies...it only takes a second to glance around.
- Revive stations under a grate are just the best thing ever. One under each grate may induce orgasms. They do not need to be immensely powerful on the heal; any heal is a good heal, and the revive works at no skill power at all
- Pulse is almost necessary here, as sight lines will be limited, however no more than two players need have it. Just as with revive stations, no skill power is necessary, you're using this for the locating/tagging ability first and foremost.
- If you can't hit an enemy because he's too far away, or behind cover, throw a grenade on the opposite side of him and force him to run away in the direction you want.
- The left end/stair of the trench is the most dangerous side, as it's the closest to the APC boss and open to turret fire. Put your toughest squadies there. The right side/stair is far more forgiving. Pulling yourself up in the open middle can be done, but you won't last long...use this only to grab a bomb dropped right next to it, and immediately drop back down.
- Again, the key is patience. Working methodically and safely from your home, you should pull this run off with no problem. If you choose to go rambo or hide elsewhere on the map, you're taking your life, and the run, into your hands. Your hands aren't as amazing as you think they are, I promise.
Last edited by a moderator:
